# Order Reports
source: https://developer.mastercard.com/open-finance-us/documentation/client-hub-guide/order-reports/index.md
The Client Hub Order Reports tool provides no-code access to Lend reports without
the need to build an API integration.
You can also use Order Reports for testing or as a temporary solution
while building an integration.
The features you can access depend on your account configuration and user role.
The user who creates the first account for a partner organization automatically
receives the Admin role. See [Managing Users](https://developer.mastercard.com/open-finance-us/documentation/client-hub-guide/order-reports/index.md#managing-users) on this page for
details of the available user roles.
* [Accessing the Client Hub for Order Reports](https://developer.mastercard.com/open-finance-us/documentation/client-hub-guide/order-reports/index.md#accessing-the-client-hub-for-order-reports)
* [Requesting a Report](https://developer.mastercard.com/open-finance-us/documentation/client-hub-guide/order-reports/index.md#requesting-a-report)
* [Customizing Request Emails](https://developer.mastercard.com/open-finance-us/documentation/client-hub-guide/order-reports/index.md#customizing-request-emails)
* [Report Reissue](https://developer.mastercard.com/open-finance-us/documentation/client-hub-guide/order-reports/index.md#report-reissue)
* [Personal Profile Settings](https://developer.mastercard.com/open-finance-us/documentation/client-hub-guide/order-reports/index.md#personal-profile-settings)
* [Company Profile Settings](https://developer.mastercard.com/open-finance-us/documentation/client-hub-guide/order-reports/index.md#company-profile-settings)
* [Managing Users](https://developer.mastercard.com/open-finance-us/documentation/client-hub-guide/order-reports/index.md#managing-users)
## Accessing the Client Hub for Order Reports {#accessing-the-client-hub-for-order-reports}
Warning: You cannot use Order Reports if you log in via a Mastercard Developers account.
If your organization has an existing account, contact your account Admin to
create your user role. For questions about plans, contact our
[Sales Team](https://www.mastercard.com/us/en/demo-request.html).
### Creating a New Account {#creating-a-new-account}
To access the Order Reports tool, sign up at the
[Client Hub](https://www.finicityreports.com/create-account/) site.
1. Enter the requested information. Your email address becomes your username.

2. Select "Lending" from the dropdown on the **Business Industry** page.

3. Select "Order Reports Service" from the dropdown on the **Use Cases** page.

4. Provide any further requested information and select an FCRA permissible
purpose.
After creating your account, you can access the Client Hub.
### Single Sign-On {#single-sign-on}
Single Sign-On (SSO) integration is available for Client Hub partners on a
case-by-case basis. We currently support **SAML 2.0 compliant** Identity
Providers (IDP) only, and all users must share the same company email domain.
SSO provides:
* Increased security
* Better control over authentication and login experience
* Ability to restrict traffic to specific IP addresses through your IDP
For SSO-integrated partners, users enter their username during authentication.
The Client Hub recognizes the email domain and redirects to your assigned SSO
identity provider (such as Okta or Google Authenticator) for verification. After
verification, a response returns to the Client Hub and authentication is
approved.
Contact your account representative if you want to add SSO integration to your
Client Hub account.
## Requesting a Report {#requesting-a-report}
Users with the appropriate role (Admin, Loan Officer, Requestor) can generate
new report requests for customers by clicking **Add Report** at the top of the
[Report Dashboard](https://www.finicityreports.com/reports) page.
You can also search for a specific report or act on existing report requests.
When you request a report, the customer is automatically emailed with a request
to grant permission to share the required data through Mastercard Data Connect.
You can customize the presentation and branding of messages sent to customers
by editing your [Company Profile](https://developer.mastercard.com/open-finance-us/documentation/client-hub-guide/order-reports/index.md#company-profile).
### Test Profiles {#test-profiles}
Mastercard provides test customer profiles to help you evaluate report creation
and simulate real use cases (various report types, account types, failures, and
more). For a comprehensive list of test profiles, see [Test
the APIs](https://developer.mastercard.com/open-finance-us/documentation/integration-and-testing/test-the-apis/index.md).
To submit a report request using test profile information:
1. **Identify a test profile:** Choose one that corresponds to the report type
you want to test. Most profiles support various report types and may not
explicitly mention the specific report you're evaluating.
2. **Create a report request:** In the Client Hub, select Order Reports from the
navigation menu and click the **+** button.
3. **Choose a report:** Select the Report Type that aligns with your test
profile.
4. **Enter test profile info:** Using the test profile information, complete the
Borrower Details section.
* Some report types (Payroll, Paystub, Mortgage, and others) may require specific information in the Borrower Details to test a valid report scenario. Ensure the information in this form (Name, SSN, DOB, and others) matches what is listed for your selected test profile. If not listed under the profile, you can enter any value.
* Enter an email address you can access to test the customer interaction through a test profile.
5. **Submit the report request:** A message with a link to complete the report
is sent to the email address you provided.
6. **Locate the report request email:** Access the email where the report
request was sent and click the button to start the report process. A new
browser window opens to start the customer permission process (Mastercard
Data Connect).
7. **Connect to a Finbank account:** In the Data Connect window, search for "finbank"
and identify the preferred test institution that aligns with your test
profile.
* For Paystub report requests, upload the provided paystub at this point.
* For Payroll only report requests, skip this step.
8. **Complete report steps:** Follow the on-screen instructions to complete the
report and validate the results in the Client Hub.
This creates a completed report that you can view or download from the Client
Hub report dashboard. Additional steps might be required through third-party
platforms (such as submitting a report to a housing GSE for mortgage
origination). See the [Lend reports
documentation](https://developer.mastercard.com/open-finance-us/documentation/products/lend/reports/index.md)
for each report for more information.
### Report Details {#report-details}
All fields in this section are required, although custom fields may have default
values or be designated optional. Data entered in custom field sections cannot
be used in the report Search feature. To learn more about Custom Fields, see
[Invoice History](https://developer.mastercard.com/open-finance-us/documentation/client-hub-guide/invoice-history/index.md).
* **Report Type:** The report generated from the request (see the next section for report descriptions)
* **Start Date:** The starting date for the report request
* **Reference ID:** Any unique identifier you want to use to identify the report request, such as an application number or loan number
* **From Email:** The email domain that the report request is sent from; the default is `noreply@finicity.com`, but if you have a custom domain configured, you can update this to your preference
* **Custom Fields:** These fields display, become required, or contain default values based on the custom options you have set
#### Report Types {#report-types}
The Order Reports feature provides access to many distinct types of reports
based on user-permissioned data. The options available to you may only
include a subset of the following list, based on your Mastercard Open Finance
services agreement.
* **Verifications of Assets (VOA):** Provides bank-validated insight into a
customer's current financial assets, including up to 12 months of transaction
history with credits and debits
* **Verification of Income (VOI):** Provides verification of a customer's income
streams (both active and inactive) based on up to 24 months of bank
transaction data; each income stream is ranked and includes a confidence score
* **Verification of Income and Employment -- Payroll:** Provides insight into a
customer's current and prior income and employment through data directly from
the payroll source
* **Verification of Assets and Income -- Transactions:** Provides verification
of a customer's income streams (both active and inactive) based on up to 24
months of bank transaction data; each income stream is ranked and includes a
confidence score. Also includes up to 12 months of transaction history with
credits and debits
* **Verification of Income and Employment -- Paystub (with TXVerify):**
Digitally extracts pay statement data and cross-verifies the data with income
transactions directly from the customer's financial institution
* **Prequalification Report (CRA):** Provides bank-validated insight into a
customer's current financial asset balances
* **Asset Summary Report (Non CRA):** No longer supported -- deprecated in 2023
* **Cash Flow Business (Non CRA):** No longer supported -- deprecated in 2023
* **Cash Flow Personal (CRA):** Provides inflow, outflow, and cash flow
information including up to 24 months of transaction history
* **Verification of Income and Employment -- Paystub:** Digital extraction of
pay statement data
* **Verification of Employment (VOE) -- OnDemand:** Provides employment details
from the customer's employer. Information obtained directly from the employer
-- no customer engagement required
* **Verification of Income and Employment (VOIE) -- OnDemand:** Provides
employment and income details from the customer's employer. Information
obtained directly from the employer -- no customer engagement required
* **MVS -- Basic (Asset, Income and Employment):** Waterfall experience to
collect all data for asset, income and employment verification through payroll
and transaction data. The customer connects to their bank accounts and payroll
data. Generates a VOIE - Payroll (if data found) report and a VOAI -
Transactions report
* **MVS -- Basic Paystub (Asset, Income and Employment):** Waterfall experience
to collect all data for asset, income and employment verification through
paystub and transaction data. The customer connects to their bank accounts and
uploads paystub(s). Generates a VOIE - Paystub (with TXVerify) and a VOAI -
Transactions report
* **MVS -- IE (Income and Employment):** Waterfall experience to collect all
information necessary for income and employment verification in a single
customer experience. The customer first connects their payroll data; if
additional employment is needed, they connect to their direct deposit
account(s) and upload their most recent paystub. Generates a VOIE - Payroll
(if data found) and a VOIE - Paystub (with TXVerify) report (if required)
* **MVS -- Full (Asset, Income and Employment):** Waterfall experience to
collect all information necessary for assets, income, and employment
verification in a single customer experience. The customer first connects to
their bank account(s) and payroll data. If the customer has additional
employment to report, they upload their most recent paystub. Generates a
VOIE - Payroll (if data found) report, a VOAI report, and a VOIE - Paystub
(with TXVerify) report (if required)
You can also access the following reports via refresh:
* **Verification of Employment (VOE) -- Payroll:** Provides insight into a
customer's current and prior employment through data directly from the payroll
source. Available via "Refresh" for a completed VOIE -- Payroll report
* **Verification of Employment (VOE) -- Transactions:** Verifies the customer's
employment by identifying customer's recent direct deposits without the income
amounts. Available via "Refresh" for a completed VOAI - Transactions report or
VOIE - Paystub (with TXVerify) report
### Borrower Details {#borrower-details}
All fields in this section are required. Use an active email address for the
customer so they can receive and act upon the report request. The Social
Security Number (SSN) provided here is hidden from all users for security
reasons.
#### Submit a Report Request {#submit-a-report-request}
After entering all required and optional information, click **Submit
Request** to send the account connection request to a customer. This sets
the report to Pending status until the customer fulfills the steps for that
report request.
You can customize the request email that customers receive -- see
[Customizing Request Emails](https://developer.mastercard.com/open-finance-us/documentation/client-hub-guide/order-reports/index.md#customizing-request-emails)
on this page for details.
Note: You can change customer information on a pending report request while the report has Pending status, but you cannot alter it after the request is fulfilled. You can change custom field information with a refresh request on a completed report.
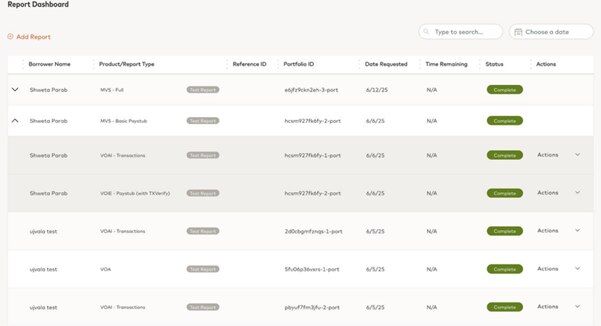
### Report Dashboard {#report-dashboard}
After creating a report request, it appears on the Report Dashboard alongside a
complete, historical view of all requested reports. You can search and sort
report records by the columns displayed:
* **User:** The Client Hub user who requested the report. This column is only visible to users with the Admin role.
* **Reference #:** The identifier used to track the loan. This could be a loan number or any other value determined by your organization.
* **Borrower Name:** The entity to whom a report request has been sent. This is who permissions the use of their banking or other data to create the requested report.
* **Report Type:** The report product requested for the customer - for example, Verification of Income (VOI) or Verification of Assets (VOA).
* **Date Requested:** The date on which the report was most recently requested.
* **Time Remaining:** For a Pending record, this is the time remaining until the report request expires. Otherwise, this field is marked as not applicable (N/A).

### Report Status {#report-status}
All records on the dashboard include a Status value, indicating the current step
of that report request. The status updates as the customer takes action to
fulfill the request until the request expires.
A report request link is only active for 72 hours from the send date.
After that time, you need to re-send the report or create a new request.
* **Pending:** The email has been sent to the customer, but the link has not been clicked.
* **In Progress:** The customer clicked on the link and completed the request.
* **Complete:** Your report is ready for use.
* **Unsuccessful:** A report could not be returned with the permissioned data. The request must be re-sent, and the customer may try again with different or new financial institutions.
* **Expired:** The link has expired. Re-send the report or create a new request.
### Take Action on a Report {#take-action-on-a-report}
You can take several actions on report requests depending on their status:
* **View:** Review a copy of the most recently completed report in your browser
* **Download**: Save a PDF copy of the most recently completed report to your
device.
* **Delete**: Remove a pending or completed report. Deleting a completed report
will also permanently delete the customer's credentials, where applicable.
* **Resend Request**: Send a new report request to the customer using the same
information as the selected request. This will require the customer to
permission accounts as if this was a brand-new request.
* **Edit Customer**: Update the customer details and custom field entries for a
pending report request.
* **Refresh Report**: Create a new report with up-to-date data using the same
accounts as the selected request.
* **Edit and Refresh Report**: Update the custom field entries and create a new
report with up-to-date data using the same accounts as the selected request.
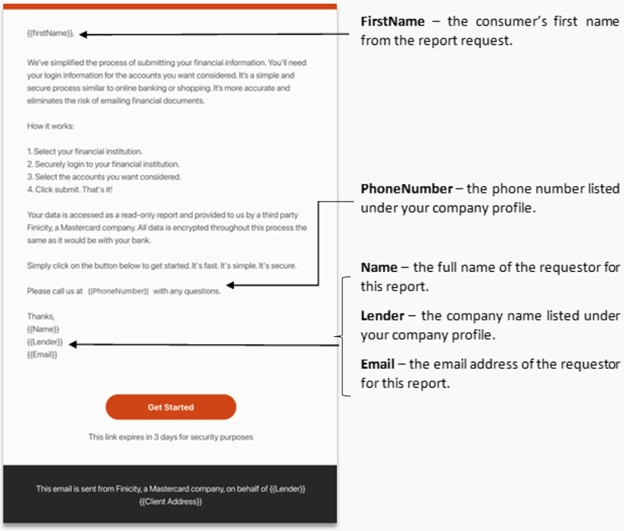
## Customizing Request Emails {#customizing-request-emails}
After you send a report request, the customer receives an email informing them of
the steps they need to take to provide access to their data. The email template
varies slightly between report types but follows a similar outline:
1. Identifies the email recipient (from report request)
2. States the overall purpose of the request
3. Outlines the actions required by the request recipient
4. Reassures the secure practices of handling customer data
5. Provides sender information (user and company details)
6. Includes a call to action button
The email template (Subject and Body) can be customized for each report type.
Each report type associated with your account is identified with an experience ID.
If you wish to customize the template for an experience ID, please work with
your account representative to provide the email Subject (plain text format) and
Body (HTML format). You can use these dynamic parameters:
* `{{> common_brandLogo}}`
* Banner containing company logo
* `{{> common_greeting}}`
* Borrower name
* `{{> common_supportPhone}}`
* Inserts "Please call us at (111) 555-1234 with any questions" (where the phone number is the one provided in your Company Profile)
* `{{> common_signature}}`
* Company name
* Report requestor first and last name
* Report requestor email for borrower notifications
* `{{> common_buttonLink defaultButtonText="Get Started"}}`
* Set button text to the text provided at the end
Note that customized email templates are subject to approval by Mastercard (User
Experience and Legal), and we reserve the right to require updates prior to
releasing any new email content. Also consider:
1. The HTML email template may or may not contain links to external sources.
2. While default templates support English, Spanish and French language
translations, multi-language custom email templates are not supported
through Order Reports (API only).
3. Future email templates updates will be subject to review.
4. We strongly recommend testing and reviewing any new email template changes
prior to launch.
## Report Reissue {#report-reissue}
[Report Reissue](https://developer.mastercard.com/open-finance-us/documentation/products/lend/get-reports/index.md#report-reissue) provides secure and auditable, no-code access for third-party entities to retrieve consumer reports directly from Order Reports system. It provides lenders and their partners with a method for sharing consumer reports between authorized third parties (such as investor, mortgage insurers, QC agencies, and loan management systems)---minimizing repetitive file exchanges, lowering risk, and facilitating more seamless cooperation throughout the loan process.
This table describes the key benefits of Report Reissue:
| Benefit | Description |
|----------------------------|-----------------------------------------------------------------------------------------------------------------------------------------------------------------------------------------------------------------------------------------------------------------------------------------------------------------------------------------|
| Scalable access | Support large numbers of third-party users and high-volume report retrieval with self-service report reissue options without manual intervention. |
| Strengthened data security | Provide read-only access through controlled channels, reducing risk and improving protection of sensitive consumer data. |
| Auditability | Maintain a clear, reliable trail of every access and retrieval event---supporting compliance requirements and simplifying internal audits. The reissued report PDF includes the name of the entity and timestamp of retrieval. The reissuing entity receives a report ID to facilitate the reissue request from the original requestor. |
| Seamless integration | Flexible options to reissue reports via our no-code report reissue portal to enable investors, mortgage insurance providers, quality control teams, and other partners to access the reports they need at the exact point they need them. A JSON option is available as well. Please visit the Developer Portal for more information. |
### Report Reissue Details {#report-reissue-details}
* **Reissue:** Each report can be retrieved up to two times within a single charge, providing access to both JSON and PDF formats under a single billing event.
* **Time frame:** Reports may be reissued up to 180 days after their original creation date.
* **PDF Reader:** Reports are delivered in PDF format and require a PDF reader to view.
* **Report ID:** The lender provides the report ID.
* **Data Refresh:** Reissuing a report does not update the data. If the data refresh is required, it must be initiated by the original requester.
### Accessing the Client Hub for Order Reports {#accessing-the-client-hub-for-order-reports-1}
If your organization has an existing account, contact your account admin to create your user role.
For questions about plans, contact our Sales Team ([OFin.contactsales@mastercard.com](mailto:OFin.contactsales@mastercard.com)).
#### Setting up Report Reissue in the Client Hub {#setting-up-report-reissue-in-the-client-hub}
1. To access the Order Reports tool, sign up at the [Client Hub](https://www.finicityreports.com/create-account/). See [Creating a New Account](https://developer.mastercard.com/open-finance-us/documentation/client-hub-guide/order-reports/index.md#accessing-the-client-hub-for-order-reports) for more information.
2. Contact our Sales Team ([OFin.contactsales@mastercard.com](mailto:OFin.contactsales@mastercard.com)) to ensure you are contracted for the Report Reissue product.
3. Ask your Mastercard account representative to add Report Reissue functionality to your Client Hub account.
### How It Works {#how-it-works}
1. Go to .
2. In the portal, navigate to the **Order Reports** section.
3. Click **Reissue Report** , located in the upper-left corner of the **Report Dashboard**.
4. Enter the **Report ID** and **Permissible Purpose** .
Note: The report can only be reissued with Permissible Purpose code 31.
5. Once the report is successfully retrieved, the PDF is available in the **Download** section.
## Personal Profile Settings {#personal-profile-settings}
You can access your [Personal Profile](https://www.finicityreports.com/profile)
by clicking on the person icon at the top right of the Client Hub.
This section enables you to update the personal information provided when you
originally signed up for the account or activated your user account.
* First and last name
* Phone number
* Sign-on Email (username for login)
* Email for borrower notifications
For Order Reports, this information is used as a signature when you
request a report from a customer. You can also choose whether to receive
notifications of reports completed by your customers.
### Change Password {#change-password}
You may also update your password on this page. When choosing a new password,
please note that a new password must:
* be at least twelve characters in length
* contain an uppercase letter
* contain a lowercase letter
* contain a number
* contain a special character
* not contain sequences of three or more repeated characters
## Company Profile Settings {#company-profile-settings}
You can access your [Company Profile](https://www.finicityreports.com/company)
by selecting **Settings \> Company Profile** at the top right of the Client Hub.
Communications generated through the Client Hub (such as Order Reports requests)
can be customized to include your company information, colors, and logos to make
them look like they are coming directly from your company, rather than a third
party.

You can customize your company name, address, city, state, zip, phone number and
URL. You can also upload your logo, pick a general color, or provide an HTML
hexadecimal value to match your brand's color.

### Custom Domain {#custom-domain}
The default email address used in report requests is
`noreply@finicity.com`.
If your company operates a custom email domain,
we recommend that you configure your account to allow for report request
notifications to be sent from that domain.
Click **Setup Custom Domain** towards the bottom of
the Company Profile page to go to the
[Validate Custom Email Domain](https://www.finicityreports.com/validate-custom-domain)
page.
Add your custom domain to the field
provided -- this generates the CNAME, S1/S2 and other information to be added to
the DNS server of your email hosting provider. Please work with your email
server admin or IT department to add the appropriate information from this
section to your hosting provider.
If required for your configuration, we
can create a custom DKIM for your company.
After customizing, we recommend that you send out a test email to ensure the
customizations are displayed as expected.
For both custom and default domain, the default username for a report request
email to be sent from is "noreply@". If you have configured a custom domain,
you can also customize the username value when requesting a report.
Currently there is no way to change the default username for all
reports at once - you must update them one by one.

### Custom Report Fields {#custom-report-fields}
You can add up to five customized
fields to your report requests.
Click **Setup Custom Fields** at the bottom of the Company Profile page
to go to the [Custom Report Fields](https://www.finicityreports.com/add-custom-fields)
page.
These fields can be auto-populated with a
default value.

## Managing Users {#managing-users}
If you are an Admin, you can access the [User Management](https://www.finicityreports.com/users)
page using **Settings \> Manage Members** at the top right of the Client Hub.
You can view the list of users with access to
your organization's account, including each user's name, status
(pending or active), and role.
### User Roles {#user-roles}
* **Admin:** able to access all settings, including access to manage members and edit Company settings. They can also see reports requested by all users. Your account can have multiple admins.
* **Developer:** able to access and edit Company settings (for example, DNS settings) and view the institution statuses page but not able to request or view reports.
* **Loan Officer:** able to access reports, request new reports and refresh active reports that they created only.
* **View Only:** able to view all reports and requests, but not generate or update a new report request.
* **Report Manager:** able to access reports, request new reports and refresh active reports created by any user.
* **Requestor:** able to resend reports, refresh reports, and file support cases.
This table details the functions available to each user role.
| **User Roles** | **Manage Members** | **Company Profile** | **Request Reports** | **View Requests** | **Edit Reports** | **Refresh Reports** |
|--------------------|--------------------|---------------------|---------------------|-------------------|------------------|---------------------|
| **Admin** | Y | Y | Y, All | Y, All | Y, All | Y, All |
| **Developer** | N | Y | N | N | N | N |
| **Loan Officer** | N | N | Y, Own | Y, Own | Y, Own | Y, Own |
| **View Only** | N | N | N | Y, All | N | N |
| **Report Manager** | N | N | Y, All | Y, All | Y, All | Y, All |
| **Requestor** | N | N | Y, Own | N | Y, Own | Y, Own |
Note: Note that some user roles can only view/edit/refresh their own report requests, whereas other user roles can access all report requests.
### Inviting New Users {#inviting-new-users}
You can add a new user with the **Invite** button on the [User Management](https://www.finicityreports.com/users)
page. You must assign each new user a role. There is no limit to
the number of users you may add to your account or for any single role.
If you need to add multiple users at once, select the **Bulk Invite**
option to upload a CSV file with information for up to 100 users.
This is the format to use:
```csv
first,last,phone,email,role
John I,Smith,(888) 888-8888,John.Smith+1@example.com,VIEW_ONLY
John II,Smith,(888) 888-8888,John.Smith+2@example.com,ADMIN
John III,Smith,(888) 888-8888,John.Smith+3@example.com,OFFICER
John IV,Smith,(888) 888-8888,John.Smith+4@example.com,REQUESTOR
John V,Smith,(888) 888-8888,John.Smith+5@example.com,DEVELOPER
John VI,Smith,(888) 888-8888,John.Smith+6@example.com,MANAGER
```
Once the CSV file has been uploaded, the specified users will receive an
email inviting them to create a password and log in.
**See also**:
* [Invoice History](https://developer.mastercard.com/open-finance-us/documentation/client-hub-guide/invoice-history/index.md)
* [Institution Status](https://developer.mastercard.com/open-finance-us/documentation/client-hub-guide/institution-status/index.md)