# Key Management
source: https://developer.mastercard.com/issuer-enrollment/documentation/tutorials-and-guides/key-management/index.md
The **Key Management** tab in [Mastercard Connect](https://www.mastercardconnect.com) allows you to create and download API access keys and encryption keys for use in both the Sandbox and Production environments.
Note: Multiple keys are available for use via Key Management. Issuers only need API signing keys and Consumer Key for using the Enroll API. Everything else needs to be ignored.

## Default Keys {#default-keys}
When you [Create a Project in the Sandbox](https://developer.mastercard.com/remote-commerce-onboarding/documentation/onboarding/#5-create-a-project-in-the-sandbox), an API Signing Key (OAuth key), Consumer Key and Encryption Key are auto-generated.
You need the following keys (for each environment) to integrate as an SRCI:
* API Signing Key (OAuth Key)
* Consumer Key. This identifies the client application and is also required to calculate the OAuth header.
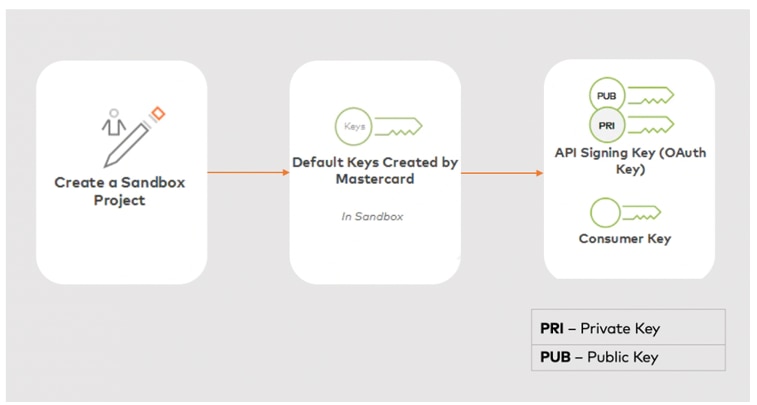
It is advisable to start with the predefined keys, then test your key generation process in the Sandbox before proceeding to the production environment.
| Key | Name | Purpose | Description |
|-----|---------------------------------|--------------------------|--------------------------------------------------------------------------------------------------------------------------------------------------------------------------------------------------------------------------------------------------------------------------------------------------------------------------------------------------------------------------------------------------------------------------------------------------------------------------------------------------------------------------------------------------------------------------------------------------------------------------------------------------------------------------------------------------------------------------------------------------------------------------------------------------------------------------------------------------------------------------------------------------------------------------------------------------|
| 1 | **API Signing Key (OAuth key)** | Authenticated API calls. | * When you call our APIs you will need to include an OAuth1.0a Authentication header. You use the private part of this API Signing Key to generate this OAuth header, so that the Mastercard API server can authenticate your access to the APIs. * Consumer Key is associated with the API Signing Key and is required in the OAuth authorization header. Consumer keys are 97-character identifiers for client applications consuming Mastercard APIs. The consumer key appears in the OAuth1.0a authorization header sent with each request. Copy the Consumer Key value to the clipboard by clicking the clipboard icon. Example of a consumer key, `vJ0KrUlYSHVaEGAWif0lD9ll7CB2FYYDzXGSWzata93676af!627a980a2bc34416981a8e1f1cbc33780000000000000000`.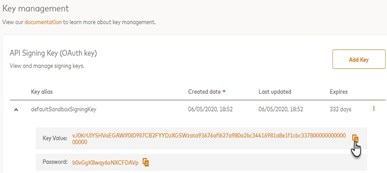 |
Note: Project keys are subject to annual renewal. The Days Until Expiry are shown next to each key on this screen. We recommend you set a reminder to add another key and transition to it prior to its expiration.
## Key Management Functions {#key-management-functions}
A drop-down menu is available next to the details of each key.
You can use this for the following actions:
| Option | Function |
|----------------|----------------------------------------------------------------------------------------------------------------------------------------------------------------------------------------------------------------------------------------------------------------------------------------------------------------------------------------------------------------------------------------------------------------------------------------------------------------------------------------------------------------------------------------------------------------------------------------------------------------------------------------------------------------------------------------------------------------------------------------------------|
| **Renew** | Key renewal is available for both API Signing and Encryption keys. For signing keys, it will bring up a "Renew Key" dialog where you can either enter a Keystore Password or upload an existing CSR file. For encryption keys, "Upload Certificate" functionality can be used to renew the key. Although you can renew an existing certificate, we recommend adding new keys. Rotating keys is a recommended security practice. |
| **Download** | Download a certificate file containing the public keys in either PEM, DER or P12 format. Only default, auto-generated keys can be downloaded in P12 format, allowing you to download the private key along with the public key. |
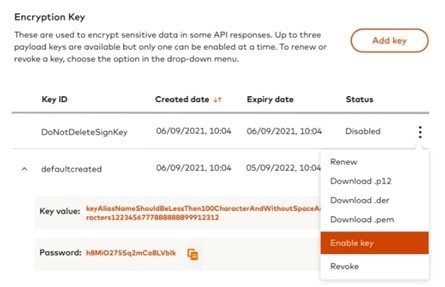
| **Enable key** | When an encryption key is created for the first time, it should be marked as an "Enabled" key. During checkout transactions, if the key fingerprint preference is not provided then this "Enabled" key will be used to perform the checkout transactions. When the enabled key is not available, and encryption key preferences are not provided during checkout, then the transaction will fail. If the enabled encryption key needs to be changed then the "Enable Key" functionality can be used. Once an encryption key is "enabled", the rest of the keys will be "disabled". Disabled keys can be used during checkout by providing key fingerprints. Note that at a given time, we recommend having one encryption key marked as "Enabled". |
| **Revoke** | Revoke a particular key. Once you revoke a key, the key becomes inactive immediately and you can no longer use it to access the APIs. When revoking an API Signing Key, ensure there's another active key. If you revoke an "enabled" encryption key, ensure that you add a new "enabled" key or mark an existing key as "enabled". |
## Adding New Keys {#adding-new-keys}
In addition to the default API Signing Key in your Sandbox project, you can add new keys. Use the Add Key button to create or upload a new key.
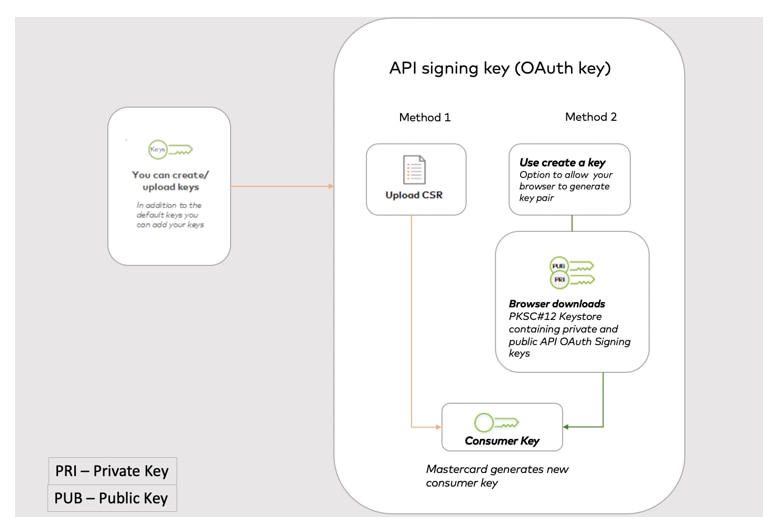
## Creating API Signing Key (OAuth key) {#creating-api-signing-key-oauth-key}
Two methods are available when creating your private signing key.
### Method 1: Using a Certificate Signing Request {#method-1-using-a-certificate-signing-request}
You can manually upload a Certificate Signing Request (CSR) generated in your system. A CSR is an encoded file that provides a standardized way to send a public key as well as some information that identifies your company and domain name. This method will keep your private key secure, at no time will Mastercard see it or be able to recover it. Once you upload your CSR, Mastercard sets a default 364 day expiry period for the API Signing certificate.
Before you can add new keys, you will need to generate a CSR from your Certificate Authority server. When you generate a CSR, you will be asked for the following information:
* Country Name (2 letter code).
* State or Province Name (full name).
* Locality Name (e.g., city).
* Organization Name (e.g., company).
* Organizational Unit Name (e.g., section).
* Common Name (e.g., server FQDN or YOUR name).
* Email Address.
* Key type (we use RSA).
* Key size (use 2048-bit).
The Common Name (CN) is a required field, which should be the FQND (Fully Qualified Domain Name) of the server or the host where you intend to use the certificate.
#### Example using OpenSSL {#example-using-openssl}
Use the following command to create a private key and public certificates.
* OpenSSL
$ ls cacert.pem cakey.pem readme.txt "\>
```OpenSSL
$ openssl req -newkey rsa:2048 -x509 -keyout cakey.pem -out cacert.pem
Generating a RSA private key
.+++++
..+++++
writing new private key to 'cakey.pem'
Enter PEM pass phrase:
Verifying - Enter PEM pass phrase:
### You are about to be asked to enter information that will be incorporated
into your certificate request.
What you are about to enter is what is called a Distinguished Name or a DN.
There are quite a few fields but you can leave some blank
For some fields there will be a default value,
If you enter '.', the field will be left blank. {#if-you-enter-3939-the-field-will-be-left-blank}
Country Name (2 letter code) [AU]:
State or Province Name (full name) [Some-State]:
Locality Name (eg, city) []:
Organization Name (eg, company) [Internet Widgits Pty Ltd]:
Organizational Unit Name (eg, section) []:
Common Name (e.g. server FQDN or YOUR name) []:
Email Address []:
`$ ls
cacert.pem cakey.pem readme.txt
`
```
In the above command :
* `req` option means you are creating a Certificate Request (pkcs10).
* `-newkey rsa:2048` means you are generating a new RSA key of 2048 bits in size.
* `-x509` means you are outputting an x509 structure instead of a cert req.
* `-keyout cakey.pem` is the private key.
* `-out cacert.pem` is the public certificate.
#### Use the following commands to create a PKCS12 file: {#use-the-following-commands-to-create-a-pkcs12-file}
* OpenSSL
```OpenSSL
openssl pkcs12 -export -in cacert.pem -inkey cakey.pem -out identity.p12 -name "keyalias"
Enter pass phrase for cakey.pem:
Enter Export Password:
Verifying - Enter Export Password:
```
In the above command:
* `-name` is the alias of the private key entry in keystore.
* `Export Password` is the Keystore password provided to access the .p12 file.
#### Use the following commands to create a CSR file: {#use-the-following-commands-to-create-a-csr-file}
* OpenSSL
$ ls cacert.pem cakey.pem certreq.csr
"\>
```OpenSSL
openssl req -out certreq.csr -key cakey.pem -new
Enter pass phrase for cakey.pem:
You are about to be asked to enter information that will be incorporated into your certificate request.
What you are about to enter is what is called a Distinguished Name or a DN.
There are quite a few fields but you can leave some blank
For some fields there will be a default value,
If you enter '.', the field will be left blank.
Country Name (2 letter code) [AU]:
State or Province Name (full name) [Some-State]:
Locality Name (eg, city) []:
Organization Name (eg, company) [Internet Widgits Pty Ltd]:
Organizational Unit Name (eg, section) []:
Common Name (e.g. server FQDN or YOUR name) []:ad
Email Address []:
Please enter the following 'extra' attributes to be sent with your certificate request
A challenge password []:
An optional company name []:
`$ ls
cacert.pem cakey.pem certreq.csr`
`
`
```
#### Use the following command to check the CSR: {#use-the-following-command-to-check-the-csr}
* OpenSSL
```OpenSSL
$ openssl req -in certreq.csr -noout -text
```
When your CSR is ready, you'll need to upload it using the **Add Key** button.
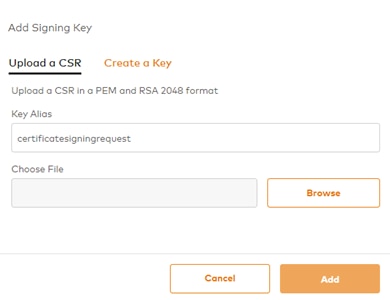
You will need to add the key alias you used in your key generation step.
Mastercard will sign your certificate and your validated public certificate and Consumer Key will be available to download. This validated public certificate is the one that Mastercard will use to check your OAuth headers on your API requests.
### Method 2: Adding keys using the browser keystore {#method-2-adding-keys-using-the-browser-keystore}
If you prefer, you can generate keys using your browser's keystore.

1. Click **Add Key**.
2. Provide a Key Alias and Keystore Password and click **Add**.
* Your browser generates a key pair and a Certificate Signing Request (CSR).
* The browser keystore secures the private key and then forwards the public key via CSR to Mastercard.
* Mastercard signs this key and sends it back as an X509 certificate.
* Upon receiving this certificate, your browser generates a PKCS#12 keystore containing both this public key and your private key secured with the passphrase (Keystore Password) you added.
3. Your browser automatically downloads this PKCS#12 keystore as a file suffixed with ".p12".
At no point does the private key leave your host. So if you lose this file, you should revoke the corresponding key and generate a new one.
Note: Always keep your private keys safe, ideally in a password-protected or hardware keystore.
In addition, you need to keep a record of the following:
| Item | Details |
|---------------------|-----------------------------------------------------------------------------|
| **SRCI Identifier** | Called SRC Client ID and found on the Dashboard. |
| **Key Alias** | The key alias used when generating the private part of the API Signing key. |
## Testing your Keys {#testing-your-keys}
### Checking the API signing key {#checking-the-api-signing-key}
You can check your API Signing Key using Insomnia. Detailed instructions are provided at [use-insomnia-rest-client-for-mastercard-apis](https://developer.mastercard.com/donations/tutorial/how-to-install-and-configure-insomnia-tool/).
## Next Steps {#next-steps}
Review the [API Authentication](https://developer.mastercard.com/issuer-enrollment/documentation/tutorials-and-guides/api_oauth/index.md) section to learn how to obtain an (OAuth) Signing Key to authenticate API calls.