# Display Merchant Details
source: https://developer.mastercard.com/consumer-clarity/documentation/tutorials-and-guides/how-to-use-response-data/displaying-merchant-details/index.md
## Overview {#overview}
Much of the response data can be presented in your app exactly as it comes to you. But for some data (such as longitude and latitude), you won't want to display it in the way you receive it. Instead, you'll want to adapt it in such a way that it becomes useful to your cardholders.
This table differentiates between the response data fields that can be used *as received* versus those that typically are not. And it also offers some suggestions for how you can use the data that you'll customize before using.
| Response field name | Use as received | Customize before using | Suggested usage |
|--------------------------------------------------------------------------------------|-----------------|------------------------|-------------------------------------------------------------------------------------------------------------------------------------------------------------------------------------------------------------------|
| **merchantName** | ✓ | | |
| **address** | ✓ | ✓ | [Convert to Map](https://developer.mastercard.com/consumer-clarity/documentation/tutorials-and-guides/how-to-use-response-data/displaying-merchant-details/index.md#convert-location-information-to-map) |
| **description** | ✓ | | |
| **websiteUrl** | ✓ | ✓ | [Button or Link](https://developer.mastercard.com/consumer-clarity/documentation/tutorials-and-guides/how-to-use-response-data/displaying-merchant-details/index.md#display-a-button-or-link-to-contact-merchant) |
| **merchantCategory.description** | ✓ | | |
| **logos** | | ✓ | [Display a Logo](https://developer.mastercard.com/consumer-clarity/documentation/tutorials-and-guides/how-to-use-response-data/displaying-merchant-details/index.md#display-a-logo) |
| **purchaseReceipt** | | ✓ | [Provide a Digital Receipt](https://developer.mastercard.com/consumer-clarity/documentation/tutorials-and-guides/how-to-use-response-data/displaying-transaction-details/index.md#provide-a-purchase-receipt) |
| **merchantCategory.code** | | ✓ | |
| **merchantLocation.longitude** **merchantLocation.latitude** | | ✓ | [Convert to Map](https://developer.mastercard.com/consumer-clarity/documentation/tutorials-and-guides/how-to-use-response-data/displaying-merchant-details/index.md#convert-location-information-to-map) |
| **intermediary** | ✓ | ✓ | [Display a Logo](https://developer.mastercard.com/consumer-clarity/documentation/tutorials-and-guides/how-to-use-response-data/displaying-merchant-details/index.md#display-information-for-an-intermediary) |
| **carbonFootprint.carbonEmissionInGrams** **carbonFootprint.carbonEmissionInOunces** | | ✓ | [Display a Carbon Score](https://developer.mastercard.com/consumer-clarity/documentation/tutorials-and-guides/how-to-use-response-data/displaying-carbon-footprint/index.md) |
## Include Descriptor Data {#include-descriptor-data}
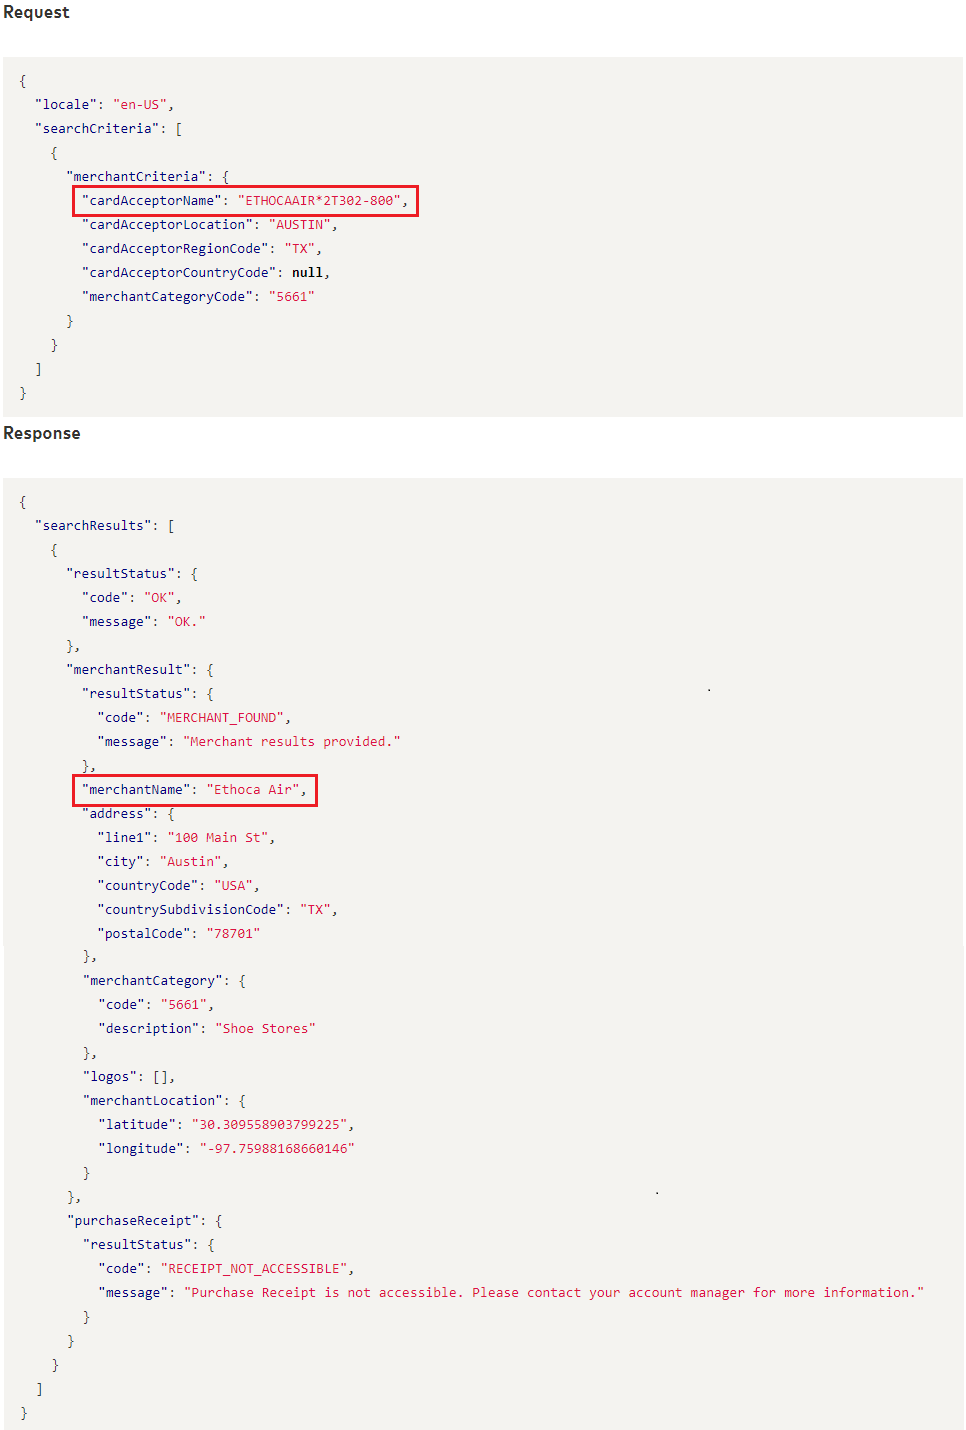
As you've learned, one of the primary benefits of Consumer Clarity is that we provide recognizable merchant names that help your cardholders identify transactions in your banking app. However, many merchants use the descriptor information to identify things like store locations and customer service numbers.
Note: As a best practice, we recommend that you display the descriptor data in your detail view, but make it less prominent than the recognizable merchant name.
This example shows **Ethoca Air** as the cleaned merchant name, but also includes the descriptor **ETHOCAAIR\*2T302-800**. The corresponding request and response are shown to the right.

## Display a Button or Link to Contact Merchant {#display-a-button-or-link-to-contact-merchant}
In some markets, you might receive a `websiteUrl` in your response, which you could display as is. But for a better user experience, consider hiding them within a **Contact Merchant** type of button or link. (Although you can use up to 100 characters for links, we recommend that you keep them to approximately 30 to 40 characters).

## Convert Location Information to Map {#convert-location-information-to-map}
Before displaying it to your users, you can convert the `merchantLocation` object information to a map:

For more information about how to do this, you'll want to review the instructions for whichever mapping tool you'll be using.
### Understanding the geolocation proximity from the response {#understanding-the-geolocation-proximity-from-the-response}
As discussed, the `merchantLocation` object returns a merchant's latitude and longitude data, which you can convert to a map. The latitude and longitude coordinates can vary in proximity to the actual location depending on how accurate or reliable a merchant address is.
The `merchantLocation` object includes the field named `type`, which helps you understand the proximity of the latitude and longitude data that's returned to the actual merchant store location. Here are details about the values returned by `type` including a graphic showing how each value can be displayed to your users:
* **Storefront:** Most precise available location of a merchant store. Typically points to the exact store location.
* **Rooftop:** Approximate physical address of the building where the merchant store is located.
* **Block:** Based on a complete street address. Points to the block where a merchant store is located.
* **Street:** Typically less proximate than **Block**. Points close to the street where a merchant store is located.
* **Postcode:** Based on a postal code. In some locations, this can be quite accurate to the merchant location (such as in the UK, where every block might have a postal code).
* **Administrative area:** Least proximate available address. Usually a city, region, village, and so on.

Note: These suggestions are not exact recommendations, but only best practices based on map vendors. You can customize these suggestions based on the map vendor you work with so that you provide the best customer experience.
Also, the accuracy of the proximity of latitude and longitude to a merchant's actual location can vary based on different markets.
Note: Address is only available in select markets. In markets where we don't have a validated address, the geolocation returned is `Administrative`, pointing to the card acceptor location/city where the transaction has taken place.
## Display a Logo {#display-a-logo}
The **logos** response can be managed so that it appears nicely in your banking app and doesn't use too much of the available "real estate". Following are some suggestions for how to use the response data for logos.
### Create your HTML code {#create-your-html-code}
Using the HTML `![]() ` tag, populate the `src` attribute with the **logo.url** response data and populate the `alt` attribute with the **logo.altTextTag** response data. For example, if you receive this response data:
"logos": [
{
"height": 200,
"width": 200,
"url": "https://content.ethoca.com/merchant/1a34567891012b123d123.png",
"altTextTag": "SHOE STORE 1234 logo"
}
then your HTML code would look like this:
`
` tag, populate the `src` attribute with the **logo.url** response data and populate the `alt` attribute with the **logo.altTextTag** response data. For example, if you receive this response data:
"logos": [
{
"height": 200,
"width": 200,
"url": "https://content.ethoca.com/merchant/1a34567891012b123d123.png",
"altTextTag": "SHOE STORE 1234 logo"
}
then your HTML code would look like this:
` `.
### Determine which size logo to use {#determine-which-size-logo-to-use}
In your **logos** response data, you'll receive two sizes: 200 x 200px and 400 x 400px. These are returned in the **logo.height** and **logo.width** attributes.
The smaller size logo is best used for your **list view** while the larger square is best for **detail view** . You can see examples of this in [List View vs. Detail View](https://developer.mastercard.com/consumer-clarity/documentation/tutorials-and-guides/how-to-use-response-data/list-view-detail-view/index.md).
### Consider the type of logo you want to display {#consider-the-type-of-logo-you-want-to-display}
A generic logo is always returned in the response data, which represents the merchant's industry. Additionally, if a merchant has provided their branded logo, it is returned as **logo.url** in the response data.
Use the **logo.type** attribute to specify whether you want to display only the *merchant* logo or if you'd rather display logos for both the *merchant* and their *industry*.
### Consider your background color {#consider-your-background-color}
One final consideration to keep in mind is the background color of your app. Most logos render best with a white or light-colored background.
## Use the dataPolicyConsent Response Data {#use-the-datapolicyconsent-response-data}
Sometimes the data that comes from a merchant might not be as detailed as it could be.
In such cases, we might use third-party data sources to further enrich the data. However, a third-party data source might include regulations that you must consent to if you would like to receive and use this data.
The `dataPolicyConsent` object indicates your consent to receive merchant data that might include these third-party implementation regulations. If left null, then it is assumed to be `false`. If marked `true`, this confirms your consent to follow the regulations provided in the merchant response.
When `dataPolicyConsent`=`true` is specified in the request, we return third-party data if it's available. For that situation, we provide regulations in the `dataPolicy` object response that you must follow. The response includes the following fields:
| Response field name | Description | Example |
|---------------------|---------------------------------------------------------------------------------------------|----------------------|
| **cacheable** | Indicates whether the merchant data provided in the response can be cached. | true |
| **cacheExpiry** | Indicates the caching expiration date and time if caching is permitted. In ISO 8601 format. | 2022-08-31T15:00:00Z |
You can implement some logic to handle `cacheable` and `cacheExpiry`. For example, if `cacheable` is `true`, specify a location where it will be cached and also check the value of `cacheExpiry`.
Note: `dataPolicyConsent` only applies to merchant details. It doesn't apply to digital receipts.
## Display Information for an Intermediary {#display-information-for-an-intermediary}
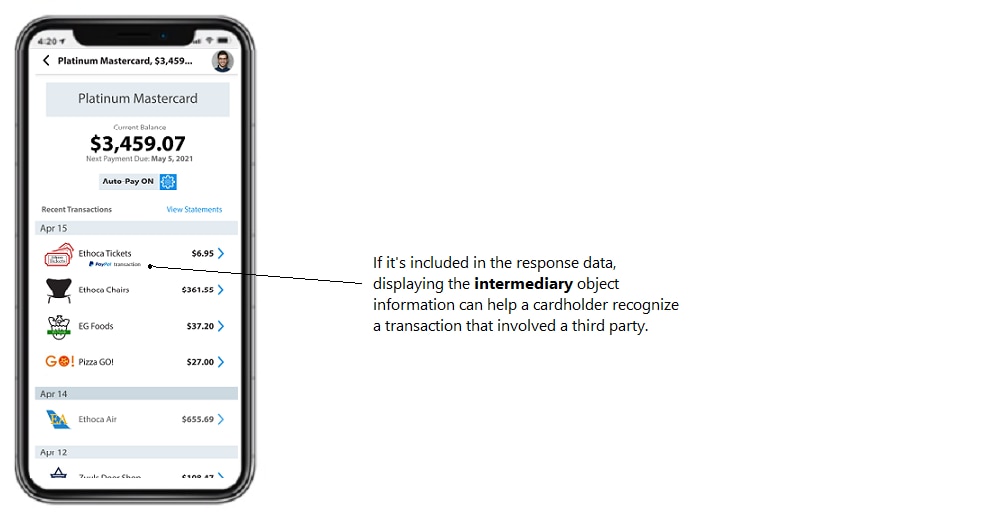
Sometimes, one or more intermediaries can be involved in a transaction, such as a payment facilitator (like PayPal or Square) or a marketplace (like Amazon or Etsy). Providing this type of information to your cardholder can further help them in recognizing their transactions.
If an `intermediary` object is included in the response data, this indicates that there's a party other than the merchant that's involved with a transaction. In this scenario, data is returned for `type`, `name`, and `logos`. You can display this data to your cardholder in **list view** or **detail view**, or both.
Note: Initially, the only `intermediary` object returned is for `type` = *payment facilitator* and `name` = *PayPal*.
Here you see an example of how you can display this data in **list view**:
## Next Steps {#next-steps}
* Understand the policies for [Caching the Response Data](https://developer.mastercard.com/consumer-clarity/documentation/tutorials-and-guides/how-to-use-response-data/caching-response-data/index.md) you receive from the Consumer Clarity API.
* Check out [Display Transaction Details](https://developer.mastercard.com/consumer-clarity/documentation/tutorials-and-guides/how-to-use-response-data/displaying-transaction-details/index.md) for tips on how to display transaction detail response data in your banking app.
* [Display Smart Subscriptions](https://developer.mastercard.com/consumer-clarity/documentation/tutorials-and-guides/how-to-use-response-data/displaying-subscription-controls/index.md) offers tips for how to display Smart Subscriptions response data in your banking app.
* If you haven't read it yet, review the differences between [List View vs. Detail View](https://developer.mastercard.com/consumer-clarity/documentation/tutorials-and-guides/how-to-use-response-data/list-view-detail-view/index.md).
* Review [Tips for Sending Requests](https://developer.mastercard.com/consumer-clarity/documentation/tutorials-and-guides/tips-for-sending-requests/index.md) for suggestions to consider when sending your requests.
`.
### Determine which size logo to use {#determine-which-size-logo-to-use}
In your **logos** response data, you'll receive two sizes: 200 x 200px and 400 x 400px. These are returned in the **logo.height** and **logo.width** attributes.
The smaller size logo is best used for your **list view** while the larger square is best for **detail view** . You can see examples of this in [List View vs. Detail View](https://developer.mastercard.com/consumer-clarity/documentation/tutorials-and-guides/how-to-use-response-data/list-view-detail-view/index.md).
### Consider the type of logo you want to display {#consider-the-type-of-logo-you-want-to-display}
A generic logo is always returned in the response data, which represents the merchant's industry. Additionally, if a merchant has provided their branded logo, it is returned as **logo.url** in the response data.
Use the **logo.type** attribute to specify whether you want to display only the *merchant* logo or if you'd rather display logos for both the *merchant* and their *industry*.
### Consider your background color {#consider-your-background-color}
One final consideration to keep in mind is the background color of your app. Most logos render best with a white or light-colored background.
## Use the dataPolicyConsent Response Data {#use-the-datapolicyconsent-response-data}
Sometimes the data that comes from a merchant might not be as detailed as it could be.
In such cases, we might use third-party data sources to further enrich the data. However, a third-party data source might include regulations that you must consent to if you would like to receive and use this data.
The `dataPolicyConsent` object indicates your consent to receive merchant data that might include these third-party implementation regulations. If left null, then it is assumed to be `false`. If marked `true`, this confirms your consent to follow the regulations provided in the merchant response.
When `dataPolicyConsent`=`true` is specified in the request, we return third-party data if it's available. For that situation, we provide regulations in the `dataPolicy` object response that you must follow. The response includes the following fields:
| Response field name | Description | Example |
|---------------------|---------------------------------------------------------------------------------------------|----------------------|
| **cacheable** | Indicates whether the merchant data provided in the response can be cached. | true |
| **cacheExpiry** | Indicates the caching expiration date and time if caching is permitted. In ISO 8601 format. | 2022-08-31T15:00:00Z |
You can implement some logic to handle `cacheable` and `cacheExpiry`. For example, if `cacheable` is `true`, specify a location where it will be cached and also check the value of `cacheExpiry`.
Note: `dataPolicyConsent` only applies to merchant details. It doesn't apply to digital receipts.
## Display Information for an Intermediary {#display-information-for-an-intermediary}
Sometimes, one or more intermediaries can be involved in a transaction, such as a payment facilitator (like PayPal or Square) or a marketplace (like Amazon or Etsy). Providing this type of information to your cardholder can further help them in recognizing their transactions.
If an `intermediary` object is included in the response data, this indicates that there's a party other than the merchant that's involved with a transaction. In this scenario, data is returned for `type`, `name`, and `logos`. You can display this data to your cardholder in **list view** or **detail view**, or both.
Note: Initially, the only `intermediary` object returned is for `type` = *payment facilitator* and `name` = *PayPal*.
Here you see an example of how you can display this data in **list view**:

## Next Steps {#next-steps}
* Understand the policies for [Caching the Response Data](https://developer.mastercard.com/consumer-clarity/documentation/tutorials-and-guides/how-to-use-response-data/caching-response-data/index.md) you receive from the Consumer Clarity API.
* Check out [Display Transaction Details](https://developer.mastercard.com/consumer-clarity/documentation/tutorials-and-guides/how-to-use-response-data/displaying-transaction-details/index.md) for tips on how to display transaction detail response data in your banking app.
* [Display Smart Subscriptions](https://developer.mastercard.com/consumer-clarity/documentation/tutorials-and-guides/how-to-use-response-data/displaying-subscription-controls/index.md) offers tips for how to display Smart Subscriptions response data in your banking app.
* If you haven't read it yet, review the differences between [List View vs. Detail View](https://developer.mastercard.com/consumer-clarity/documentation/tutorials-and-guides/how-to-use-response-data/list-view-detail-view/index.md).
* Review [Tips for Sending Requests](https://developer.mastercard.com/consumer-clarity/documentation/tutorials-and-guides/tips-for-sending-requests/index.md) for suggestions to consider when sending your requests.